Modified : 06 Jun 2022
Intro
In this tutorial, you will learn how to create signup & login pages, server authentication, user verification and multi-factor authentication setup. I'm assuming you have already installed and initialized a node js server. If not, follow Install NPM & Node JS
Concept
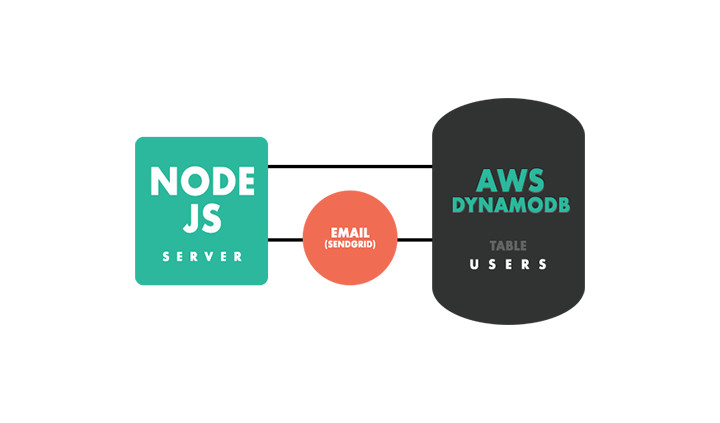
Let's discuss the flow of the app. The user will sign up using a form on the signup page. After signing up, we will ask them to verify the email. This can be done in two ways, a six digit code or a link sent to email. For the sake of simplicity and less work on the user's end we will go with verifying by link. After the user verifies, we will prompt the user to add 2-factor (multifactor) authentication. This can be done either by sending code via sms or to email and I will choose the latter.
Prerequisites
Before we get started, you need to have a complete understanding of the following packages and concepts. Take a minute to divulge into it if you are a beginner, otherwise it will be hard to follow the tutorial.
Step - 1
Install packages
Install the required packages in your node application. Then create or login your AWS account. AWS has a lot of free tiers which includes dynamodb. If you want to keep the environment completely local, then download a copy of dynamoDB and set it up locally.
npm install --save aws-sdk express express-handlebars cookie-parser body-parser bcryptjs jsonwebtoken @sendgrid/mail
Step - 2
Configure AWS
After installing all the packages, set up your AWS config using the credentials (API Keys) obtained from AWS's IAM. Make sure you attach the dynamodb policy to the role created in AWS. Now, create a users table in dynamodb with partition key name userid and sort key name processed_on.
Step - 3
Import packages & run node server
There are many packages available in npm repo to monitor the application changes and restart the node app automatically. My favorite is nodemon, so we will go with it.
npm install -g nodemon
Create necessary folders in the project folder according to handlebars specifications. If you are new to this, then you need to create this structure as shown below and create
- lib
- helpers.json
- node_modules
-
static_files
- images
- css
- js
-
views
-
layouts
- main.handlebars
- partials
- login.handlebars
- signup.handlebars
-
layouts
- index.js
Copy and paste the following code into your index.js file. Create your own JWT secret.
      var express = require('express');
var app = express();
var bodyParser = require('body-parser');
app.disable('x-powered-by');
var bcrypt = require("bcryptjs")
var cookieParser = require('cookie-parser')
app.use(bodyParser.json());
app.use(bodyParser.urlencoded({
  limit: "20mb",
  extended: true,
  parameterLimit: 50000
}));
app.use(cookieParser())
var handlebars = require('express-handlebars').create({
  defaultLayout: 'main',
  helpers: require('./lib/helpers').helpers
})

app.engine('handlebars', handlebars.engine);
app.set('view engine', 'handlebars');
app.use('/static_files', express.static(__dirname + '/static_files'));
const mail = require('@sendgrid/mail');
mail.setApiKey('sendgrid-api-key');
const AWS = require('aws-sdk')
// Save the aws credentials in json file
AWS.config.loadFromPath(__dirname + '/awsCreds.json')
const db = new AWS.DynamoDB.DocumentClient();

var jwt = require('jsonwebtoken');
const jwtSecret = 'your_custom_secret_token'

// Middleware to check if user is logged in or not
app.use( (req,res,next)=>{
  if (req.cookies.app_login){
    jwt.verify(req.cookies.app_login, jwtSecret, function(err, decoded) {
      if(decoded){
        req.decoded = decoded
        req.isLoggedin = true
        next()
      }else{
        next()
      }
    })
  }else{
    next()
  }
})

app.get('/login', (req,res)=>{
  res.render('login')
})

app.get('/signup', (req,res)=>{
  res.render('login')
})
app.listen(9000)
Copy & paste this code into your main.handlebars. Create a favicon.png file in your static_files > images. Modify the title and meta content to your requirement
      <!DOCTYPE html>
<!-- Developed by Siva Kishore G-->
<html lang="en">
  <head>
	<meta charset="utf-8">
	<meta name="viewport" content="width=device-width, initial-scale=1">
	<meta http-equiv="Content-Type" content="text/html; charset=utf-8">
	<meta http-equiv = "X-UA-Compatible" content="IE=edge">
  <link rel="icon" href="/static_files/images/favicon.png"/>
	<link rel="stylesheet" href="https://use.fontawesome.com/releases/v5.0.13/css/all.css" integrity="sha384-DNOHZ68U8hZfKXOrtjWvjxusGo9WQnrNx2sqG0tfsghAvtVlRW3tvkXWZh58N9jp" crossorigin="anonymous">
  <link href="https://cdn.jsdelivr.net/npm/bootstrap@5.1.3/dist/css/bootstrap.min.css" rel="stylesheet" integrity="sha384-1BmE4kWBq78iYhFldvKuhfTAU6auU8tT94WrHftjDbrCEXSU1oBoqyl2QvZ6jIW3" crossorigin="anonymous">
  <link rel="stylesheet" type="text/css" href="/static_files/css/{{pageCSS}}.css">
  <title>Login Tutorial</title>
	<meta name="description" content= "Login tutorial">
  </head>
  <body>
    <div class="site-content">
      {{{body}}}
    </div>
	</body>
  <script
	  src="https://code.jquery.com/jquery-3.1.1.min.js"
	  integrity="sha256-hVVnYaiADRTO2PzUGmuLJr8BLUSjGIZsDYGmIJLv2b8="
	  crossorigin="anonymous"></script>
  <script src="https://cdn.jsdelivr.net/npm/bootstrap@5.1.3/dist/js/bootstrap.bundle.min.js" integrity="sha384-ka7Sk0Gln4gmtz2MlQnikT1wXgYsOg+OMhuP+IlRH9sENBO0LRn5q+8nbTov4+1p" crossorigin="anonymous"></script>
	<script src="/static_files/js/{{pageJS}}.js" ></script>
</html>
Copy and paste the HTML code from signup into your signup.handlebars file. Copy the JS file and create the javascript files appropriate for login & signup pages. Save them under static_files > js.
Copy and paste the HTML & CSS code from page centered section into your login.handlebars file.
Step - 4
Signup Logic
Create a post request api in your index.js and save the values supplied by the signup form. Here, we need to add some additional fields such as userStatus , processed_on
      app.post('/signup', (req, res) => {
  bcrypt.hash(req.body.password, 8, function(err, hash) {
    if(err) return res.status(503).send("Error creating a secure password. Try again")
    delete req.body.password //dont store the password in plain text
    var email_token = "some random string"
    db.put({
      TableName: "users",
      Item: {...req.body,email_token,processed_on : Date.now(),pass_hash:hash,userStatus:'pending'},
      ConditionExpression: 'attribute_not_exists(userid)'
    },(err,data)=>{
      if(err) return res.status(503).send( err.code === "ConditionalCheckFailedException" ? "User Already Exists" : "Signup Error. Contact Admin")
      var token = jwt.sign({userid:req.body.userid,firstname:req.body.firstname, lastname:req.body.lastname}, jwtSecret, {expiresIn: 24 * 60 * 60}) // jwt token valid for 24 hours

      res.cookie('app_login', token, {
        maxAge: 86400000,
        httpOnly: true
      })
      res.send("Signup Successful")
    })
  });
})
Step - 5
Login Logic
Create a post request api in your index.js. Get the userid from the request body and check the database. If the userStatus is pending, notify the user that email verification is pending and send him/her the verification link via email
      function welcomeEmail(userid){
  var email_token = jwt.sign({userid}, jwtSecret, {expiresIn:5 * 60}) //token expires in 5 minutes
  let msg = {
    from: 'no-reply@mywebsite.com',
    to: email,
    replyTo: 'admin@mywebsite.com',
    subject: 'Welcome to my awesome website',
    html: `Click this link to verify the email <a target="_blank" href="https://mywebsite.com/verify?token=${email_token}">here</a>`
  }
  mail.send(msg, (error, result) => {});
}

app.post('/login', (req, res) => {
  if(!req.body.password) return res.status(503).send("Password field is not supplied")
  if(req.body.password.trim() === "") return res.status(503).send("Empty password supplied")
  db.get({
    TableName : 'users',
    Key : {userid : req.body.userid}
  },(err,data)=>{
    if(err) return res.status(503).send("Login Error. Contact Admin")
    if(!data.Item) return res.status(503).send("User does not exists")
    if(data.Item.userStatus === 'pending') {
      welcomeEmail(req.body.userid)
      return res.status(401).send("Email verification required")
    }

    bcrypt.compare(req.body.password, data.Item.pass_hash, (err,result)=>{
      if(err) return res.status(503).send("Incorrect password")
      if(!result) return res.status(503).send("Incorrect password")

      var token = jwt.sign({userid:req.body.userid}, jwtSecret, {expiresIn: 24 * 60 * 60})
      res.cookie('app_login', token, {
        maxAge: 86400000,
        httpOnly: true
      })
      res.send("Logged in succesfully")
    })
  })
})
Step - 6
Verify Email
Create a get request in your index.js. This step is to verify the email of the user. So, the user clicks on the link received in the email which has an embedded JWT token. Once the user opens the link, get the token and verify the JWT. If it passes then get the userid and change the value of userStatus to "active" else, send 401 status.
      app.get('/verify',(req,res)=>{
  if(!req.query.token) return res.status(401).send("Unauthorized usage")
  jwt.verify(req.query.token, jwtSecret, function(err, decoded) {
    if(err) return res.status(401).send("Unauthorized usage")
    if (!decoded) return res.status(401).send("Unauthorized usage")
    var userid = decoded.userid
    db.update({
      TableName: 'users',
      Key : {userid},
      UpdateExpression : "SET #us = :val",
      ExpressionAttributeNames : {"#us" : "userStatus"},
      ExpressionAttributeValues : {":val" : "active"}
    }, (err, data) => {
      if(err)  return res.status(401).send("Unable to verify the user")
      res.send("User Verified")
    })
  })
})
Conclusion
This is the easiest login and signup flow for devs who are into AWS. This can be modified to use with AWS STS. Or, if you would like to overhaul completely, use AWS amplify (AWS Cognito).
Please feel free to post comments if you think there is any flaw or modification required.Post a comment
Comments
Recent Posts

Webcam to CCTV
Do you want to access your webcamera remotely? Then this article is for you.

Calendar Picker
Calendar Picker / Appointment Setter JS CSS Library. Inspired by Calendly.

File Sharing Server
Create a local file sharing server with realtime sync feature using Socket IO.

Tailwind Navbars
Most beautiful Navbars designed with tailwind css. Fully responsive templates.
Dashboard UIs
Most beautiful dashboards designed with bootstrap 5. Inspired mostly from dribble and other sources.

HTML Email Tempaltes
Most commonly used HTML email templates. Welcome email, sign up, password reset etc.

Payment Page UI
Checkout our most downloaded payment page ui designed with bootstrap.

Auto Logout Feature
Detect user's inactivity and auto logout after certain timeout using various JS features.

HTML Popups
Keep the user engaged and gain recurring website traffic. Includes templates.
Geolocation
How to get a user's location using Javascript and other techniques available today.
Recent Utilities
- Numerology Calculator
- Invoice Builder
- Chatbot Builder
- QR Tickets
- WPNavbars
- Schema Generator
- Loading shimmer
- Day Planner
- Image Resizer

 Cookie Consent