Modified : 26 Jun 2022
 Requires bootstrap 5 and fontawesome 6
Introduction
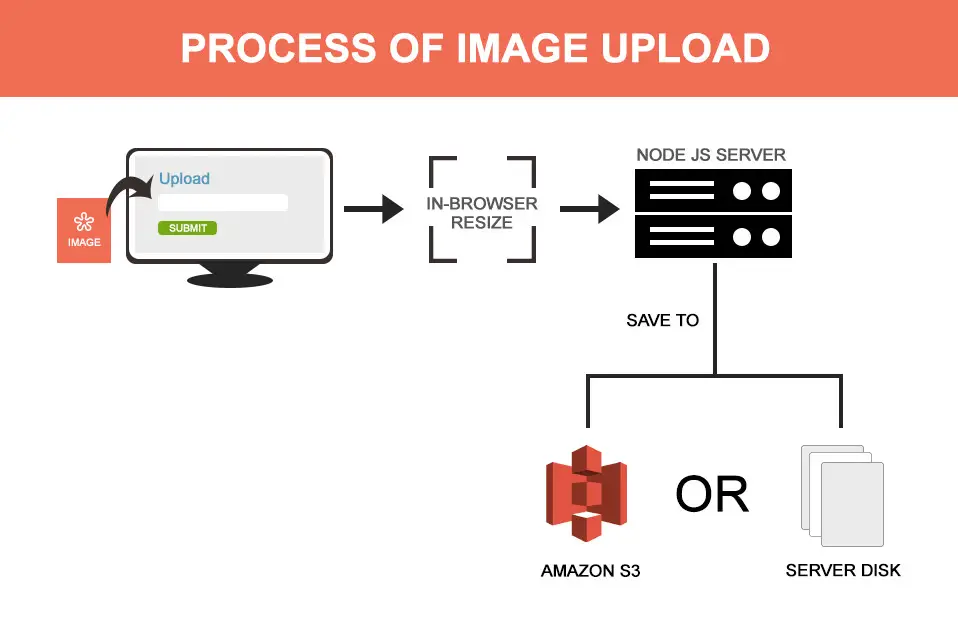
This is a production grade template which includes all the things you would want to include when designing a file upload using a node js server. Many npm packages like multer, busboy, upload-file exist to ease the process but by far express-handlebars is the easiest.
Process
- Configure exress-fileupload
- Build a front end to upload new images and show case the existing
- Upload image as multipart/form-data
- Resize the image before uploading it to the server
- Save image to disk
- Upload to S3
1. Configure Express Fileupload
When using exress-fileupload package, you can put file size limits and saving paths etc. Use temp folder for better memory management.
View code
var fileUpload = require('express-fileupload')
app.use(fileUpload({
  useTempFiles: true,
  tempFileDir: 'tmp/',
  limits: {
    filesize: 2 * 1024 * 1024 // 2mb limit
  }
}));
2. Design UI
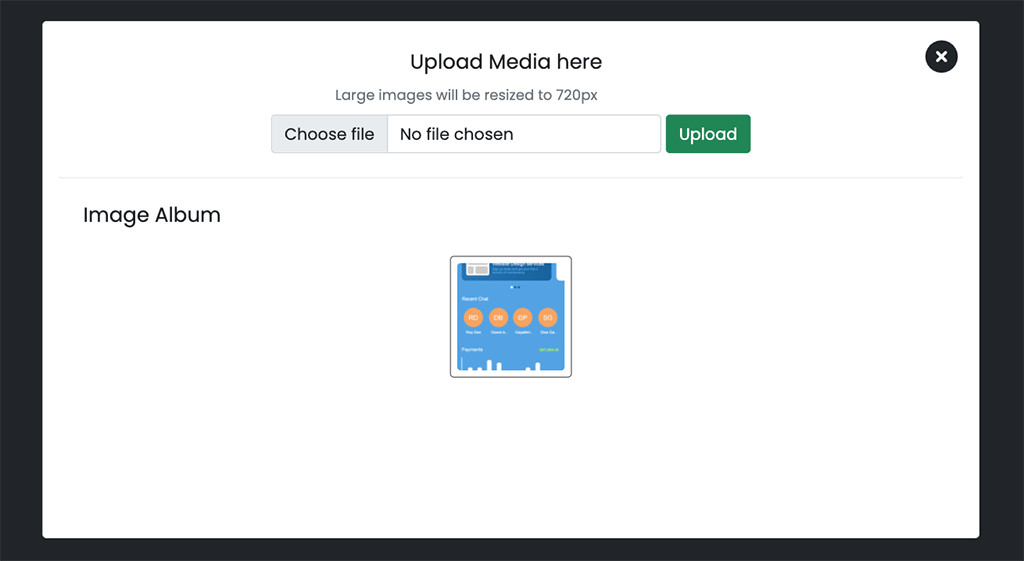
The ui features a button when clicked a media box will popup which has html file upload, and below a showcase to feature current existing images. The popup is a custom built lightbox. When the popup appears, you would want to do a http GET request to get all the current images residing in the server.
I've implemented a image loading gif to portray the image being uploaded
View code
          #imageUploadWizard {
  display:none;
  position:fixed;
  top:0;
  left:0;
  width:100%;
}

#mediaBox {
  padding:4px;
  width: 90vw;
  height:90vh;
  margin:5vh 5vw;
  overflow: auto;
}
#closeBox .fa-circle-xmark:active {
  color : #f56464
}

#closeBox .fa-circle-xmark {
  transition:transform 200ms linear;
}
#closeBox .fa-circle-xmark:hover {
  transform:scale(0.9);

}
#closeBox {
  float:right;
  font-size:32px;
  margin-right: 17px;
  margin-top:8px;
}
.imgBlock {
  cursor:pointer;
  border:1px solid #656565;
  padding:6px;
  border-radius:4px;
  margin:12px;
  width:120px;
  height:120px;
  transition: all 200ms linear;
}
.imgBlock {
  cursor : pointer;
}
.imgBlock:hover {
  transform : scale(1.1)
}
.imgBlock img {
  border-radius:4px;
}
<button onclick="openWizard()">Open Media</button>
<div id="imageUploadWizard" class="bg-dark">
   <div class="bg-white rounded" id="mediaBox">
      <div id="closeBox">
         <i class="fa-solid fa-circle-xmark" onclick="closeWizard()"></i>
      </div>
      <div class="container">
         <div class="p-4 rounded text-center border-bottom">
            <h2 class="h5 ps-1">Upload Media here</h2>
            <div style="width:24rem; display:inline-block;">
               <label for="upload" class="form-label text-muted">
               <small>Large images will be resized to 720px</small>
               </label>
               <input class="form-control" type="file" id="upload" accept=".jpg,.png,.gif">
            </div>
            <div style="display:inline-block;vertical-align:bottom;">
               <button class="btn btn-success" id="uploadBtn" onclick="upload()">Upload</button>
            </div>
         </div>
         <div class="p-4 rounded"  id="uploadedBox">
            <h2 class="h5">Image Album</h2>
            <div id="images" class="text-center pt-2">
            </div>
         </div>
      </div>
   </div>
</div>
function openWizard(){
document.getElementById('imageUploadWizard').style.display = "block"
$.ajax({
url: '/get-all-images',
type: 'post',
cache: false,
data: {}, // Empty
success: function(images){
if(files.length === 0) return
var html = ``
for(var f of files){
var rand = Math.random().toString(36).substring(2)
html += `<div class="d-inline-block imgBlock"><img src="/public/${f}" id="${rand}" style="width:100%;height:100%;object-fit:cover" /></div>`
}
document.getElementById('images').innerHTML = html
},
error: function(err){
console.log(err)
}
})
}
function closeWizard(){
document.getElementById('imageUploadWizard').style.display = "none"
}
// Use this route read the public folder content - this is where we will save the uploaded images
router.post('/get-all-images', (req,res)=>{
  var path = __dirname + '/public/' // Use path.resolve of path package in case of error
  fs.readdir(path,(err,files)=>{
    if(err) return res.status(503).send("Fetch error. Contact Admin")
    res.send(files)
  })
})
3. Upload Image
We will use jqeury's $.ajax to send the image file to the server as a multipart/form-data type. While uploading, show the loading gif temporarily and replace with the received image file path after upload completion.
View code
function upload(){
var updBtn = document.getElementById('uploadBtn')
var files = document.getElementById('upload').files
if(files.length > 0){
  var updBtn = document.getElementById('uploadBtn')
  updBtn.disabled = true
  resizeImage(files[0],(err,file)=>{
    if(err) return updBtn.disabled = false
    var rand = Math.random().toString(36).substring(2)
    $('#images').prepend(`<div id="parent_${rand}" class="d-inline-block imgBlock"><img src="/static_files/images/loading.gif" id="${rand}" style="width:100%;height:100%;object-fit:cover" /></div>`)
    var data = new FormData()
    data.append('file', file)
    $.ajax({
      url: '/upload-image',
      type: 'post',
      enctype: 'multipart/form-data',
      processData: false,  // tell jQuery not to process the data
      contentType: false,
      data: data,
      success: function(imgName){
        document.getElementById(rand).src = '/public/'+imgName // Replace the gif image with uploaded image
        updBtn.disabled = false
      },
      error: function(err){
        document.getElementById(`parent_${rand}`).remove() // To remove the loading gif
        updBtn.disabled = false
      }
    })
  })
}
}
4. Resize the image before uploading it to the server
Using canvas and file reader, one can resize the image in the browser itself before vending it off to the server. This way, the initial file size can be kept small and thus keeping the server at its optimum performance.
View code
 // Resizing the image to a max of 640px
function resizeImage(imageFile,cb) {
  const reader = new FileReader();
  reader.readAsDataURL(imageFile);
  reader.onload = event => {
    const img = new Image();
    img.src = event.target.result;
    img.onload = () => {
        const elem = document.createElement('canvas');
        if(img.height < 640 && img.width < 640) return cb(null,imageFile)
        var asp = img.height / img.width // Aspect Ratio
        elem.width = 640
        elem.height = Math.floor(elem.width * asp) // Maintaining the aspect ratio
        const ctx = elem.getContext('2d');
        // img.width and img.height will contain the original dimensions
        ctx.drawImage(img, 0, 0, elem.width, elem.height);
        ctx.canvas.toBlob((blob) => {
          var newFile = new File([blob], Date.now()+"_"+imageFile.name, {
            type: imageFile.type,
            lastModified: Date.now()
          });
          cb(null,newFile)
        })
      },
      reader.onerror = error => cb("Error",null);
  }
}
5. Save to Disk
Initially, the images are saved in a temp folder. These can be moved to another location, based on how you set up your static files folder.
You might want to ask why we need a temp folder in the first place? Right?
The temp folder has some benefits. The folder contents gets cleared on server reboot, no exclusive maintenance needed. Sometimes, the image uploaded is only for temporary reasons; for example if you are building an image manipulation online tool where you don't need to save the user uploaded images.
But if you don't like the concept temp file, mention the file path while configuring the package
View code
router.post('/upload-image',(req,res)=>{
  var file = req.files.file
  var path = __dirname + '/public/' + file.name // Use path.resolve of path package in case of error
  file.mv(path,(err)=>{
    if(err) return res.status(503).send("Unable to save")
    res.send(file.name)
  })
})
6. Upload to AWS S3
The image file obtained from the server with req.files is actually saved into the temp folder. This can be passed into the below AWS function for the image to be uploaded to AWS S3. I'm also including functions on how to get a list of images saved in a particular album and delete images from the album.
If you are using S3 for storing images for your website, it is best to make the file "public-read" using the "ACL". See line 22.
View code
let AWS = require('aws-sdk')
AWS.config.loadFromPath(__dirname + '/awsCreds.json')
var s3 = new AWS.S3({
  apiVersion: '2006-03-01',
  params: {
    Bucket: '<BUCKET_NAME>'
  }
});

function addPhoto(file, albumName, cb) {

  // s3.config.params.Bucket = perma
  var fileName = file.name
  var albumPhotosKey = albumName + '/';
  var photoKey = albumPhotosKey + fileName;

  require('fs').readFile(file.tempFilePath, (err, data) => {
    if (err) return cb(err,null)
    s3.upload({
      Key: photoKey,
      Body: data,
      ACL: 'public-read',
      ContentType: file.mimetype
    }, function(err, data) {
      if(err) return cb(err,null)
      cb(null,data)
    });
  })
}

function listAlbumsImages(albumName, cb) {
  var Prefix = albumName + '/'
  var Delimiter = '/'
  s3.listObjects({
    Prefix,
    Delimiter
  }, function(err, data) {
    if (err) return cb(err,null)
    var alb = []
    for (var content of data.Contents) {
      alb.push(content.Key)
    }
    cb(null,alb)
  })
}

function deleteAlbumImage(perma, cb) {
  s3.deleteObject({
    Key : perma
  }, function(err, data) {
    console.log(err)
    if (err) return cb("There was an error deleting your image",null);
    cb(null,data)
  });
}
Conclusion
Till now, we discussed multipart file upload but what about base64 ? sure! There are other techniques where you don't need fancy packages if using data urls or base64. Simply upload the string using fetch or axios. But it's not so cut & dry, there are pain points.
I urge you to try different ways and see which method you prefer and why. Leave a comment in the comment section below.
Post a comment
Comments
Recent Posts

Webcam to CCTV
Do you want to access your webcamera remotely? Then this article is for you.

Calendar Picker
Calendar Picker / Appointment Setter JS CSS Library. Inspired by Calendly.

File Sharing Server
Create a local file sharing server with realtime sync feature using Socket IO.

Tailwind Navbars
Most beautiful Navbars designed with tailwind css. Fully responsive templates.

Dashboard UIs
Most beautiful dashboards designed with bootstrap 5. Inspired mostly from dribble and other sources.

HTML Email Tempaltes
Most commonly used HTML email templates. Welcome email, sign up, password reset etc.

Payment Page UI
Checkout our most downloaded payment page ui designed with bootstrap.

Auto Logout Feature
Detect user's inactivity and auto logout after certain timeout using various JS features.

HTML Popups
Keep the user engaged and gain recurring website traffic. Includes templates.

Geolocation
How to get a user's location using Javascript and other techniques available today.
Recent Utilities
- Numerology Calculator
- Invoice Builder
- Chatbot Builder
- QR Tickets
- WPNavbars
- Schema Generator
- Loading shimmer
- Day Planner
- Image Resizer