Modified : 06 Jun 2022

Introduction
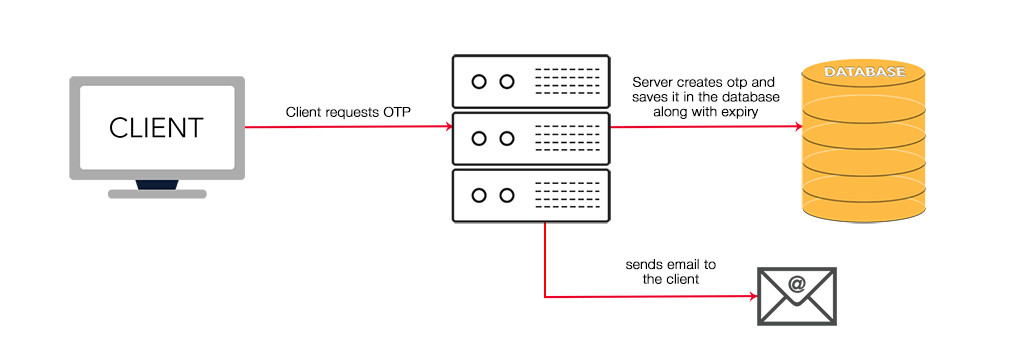
OTP stands for "One Time Password" which is very common in applications that need a lot of security. For example, online transactions require an otp generated and sent to the right user's mobile / email to verify the authenticity of the transaction.
In this tutorial we will use SendGrid's email and node js to send and verify the otps. OTPs are short lived and require regeneration upon expiry. We will discuss 3 ways to store, retrieve and set expiry for the otp. Choose any method you like to include in your project.
 Use Twilio to send otps to mobile phones.
-
DynamoDB with TTL
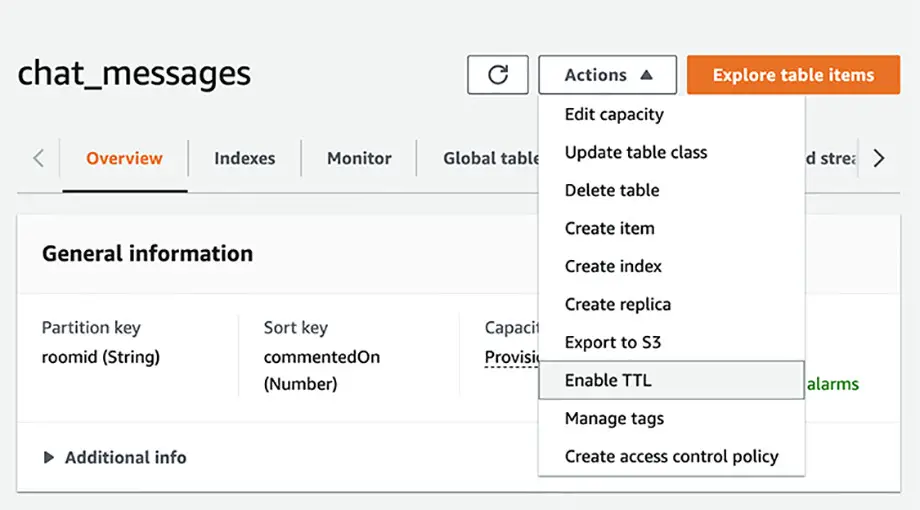
Amazon's DynamoDB has a concept of TTL, which means after a certain time, the record will be deleted. This method is cost effective and might be even free if you are in the range of AWS's free tier. The downside to this method is, table reads may not be consistent. Read more
npm install --save aws-sdklet AWS = require('aws-sdk') AWS.config.loadFromPath(__dirname + '/awsCreds.json') let db = new AWS.DynamoDB.DocumentClient(); -
Redis Server (recommended)
The Redis server stores key pair values and it's really fast since the objects are stored in the memory. Store the values with expiry time and retrieve it as needed. Follow this tutorial if you need to install it on your ubuntu server. It's so surprising how little documentation is there for the redis npm package. Mostly it has to be inferred from the official redis documentations.
npm install redis --saveimport { createClient } from 'redis'; // IF ES5/ES6 // var { createClient } = require('redis'); // Without ES (async () => { const client = createClient(); client.on('error', (err) => console.log('Redis Client Error', err)); await client.connect(); await client.set('key', 'value'); const value = await client.get('key'); })(); await client.set('key', 'value', { EX: 10, // Expiry in seconds NX: true // Set expiry only when the key has no expiry }); -
JWT
This is by far the easiest implementation, but not as secure as the above two. This is best suited for email verifications, account verification by link etc.
npm install jsonwebtoken --savevar jwt = require('jsonwebtoken') var jwtSecret = 'my-secret-key' var token = jwt.sign({ userid: 'user@example.com', code : '1234' }, jwtSecret, { expiresIn: 180 }) // https://example-website.com/verify-email?token=<JWT_TOKEN> Encrypt the token with bcrypt to further bolster security
Send email
As mentioned before, I'm using sendgrid's npm package to send emails. You can create a free account and send upto 100 emails per day (at the time of writing this article) which is more than sufficient for a small sized project. Using sendgrid, you can send HTML emails and simple text emails in one shot. Create a Mailer.js file and paste the code below. Design an email HTML template and place it in the same folder with a name otpTemplate.html Rest of the code is self explanatory.
// Mailer.js file
const mail = require('@sendgrid/mail');
mail.setApiKey('REPLACE WITH YOUT API KEY');

function sendMail(args,cb){
  var fs = require('fs')
  fs.readFile(__dirname + '/otpTemplate.html','utf8', (err, data) => {
    if(err) return cb("Error reading file",null)
    let msg = {
      to: 'youremail@mail.com',
      from: args.emailid,
      replyTo: args.emailid,
      subject: 'Verify the account with OTP',
      html: data.replace.replace("{{OTP}}",args.otp),
      text: `Your otp for the account validartion is ${args.otp} and is valid for next 10 minutes`
    };
    mail.send(msg, (error,result)=>{
      cb(error,result)
    });
  })
}

module.exports.sendMail = sendMail
Send SMS
There are many third party services such as , Twilio (most common), msg91 charge competitive prices to send OTPs to mobile phones. Each message is chargable. It's out of the scope of this tutorial to get into all those. But, if you like to give it a shot, try twilio and if you like to be more cost effective, try AWS SNS.
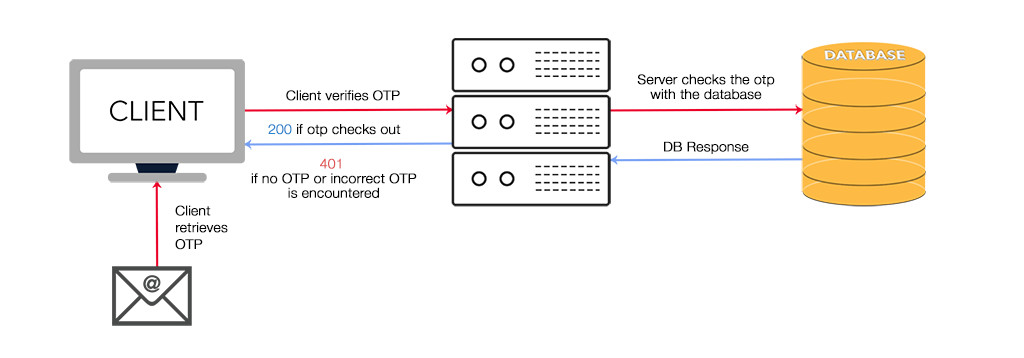
Process (with database)
Now that you understand the basic concept and the flow, try it on your own. If you are still not clear on how to implement it, see the loosely coupled code below.
-
Request OTP and save it in DynamoDB
app.post('/request-otp', (req,res)=>{ var otp = Math.floor(100000 + Math.random() * 900000) db.put({ TableName: 'otps', Item: { username: req.body.emailid, otp: otp } }, (err, data) => { if (err) return res.status(503).send("Unable to generate OTP. Try again later") var args = { emailid: req.body.emailid, expires_at: Date.now() + 180000, // 180 seconds expiry and the field expires_at is configured as TTL otp: otp } require('./mailer').sendMail(args,(err,data)=>{ if (err) return res.status(503).send("Unable to send email. Try again later") res.send("OTP Sent Successfully. Check your email") }) }) }) -
Request OTP and save it in redis
var { createClient }= require('redis'); app.post('/request-otp', async (req,res)=>{ var otp = Math.floor(100000 + Math.random() * 900000) var client = createClient(); await client.connect(); await client.set('otp', otp, { EX : 180 }) var args = { emailid: req.body.emailid, expires_at: Date.now() + 180000, // 180 seconds expiry and the field expires_at is configured as TTL otp: otp } require('./mailer').sendMail(args,(err,data)=>{ if (err) return res.status(503).send("Unable to send email. Try again later") res.send("OTP Sent Succesfully. Check your email") }) }) -
Retrieve the OTP from DynamoDB
app.post('/verify-otp', (req,res)=>{ db.get({ TableName : 'users', Key : {username:req.body.emailid} }, (err, data) => { if (err) return res.status(503).send("Unable to verify OTP. Try again later") if (!data.Item.otp) return res.status(422).send("Invalid otp. Resend OTP") // use this status code to prompt the user to resend the otp if(data.Item.otp !== req.body.otp) return res.status(401).send("Incorrect OTP") res.send("OTP verified") }) }) -
Retrieve the OTP from Redis
var { createClient }=  require('redis');
app.post('/verify-otp', (req,res)=>{
  client = createClient();
  await client.connect();
  const otp = await client.get('otp');
  if(otp !== req.body.otp) return res.status(401).send("Incorrect OTP")
  res.send("OTP verified")
})
Conclusion
In this tutorial, we have discussed all three methods of OTP generation and verification. I'm leaving the JWT code method implementation to your expertise. Now, which method do you like and why?, please post your comments in the comment section below.
Post a comment
Comments
Recent Posts

Webcam to CCTV
Do you want to access your webcamera remotely? Then this article is for you.

Calendar Picker
Calendar Picker / Appointment Setter JS CSS Library. Inspired by Calendly.

File Sharing Server
Create a local file sharing server with realtime sync feature using Socket IO.

Tailwind Navbars
Most beautiful Navbars designed with tailwind css. Fully responsive templates.

Dashboard UIs
Most beautiful dashboards designed with bootstrap 5. Inspired mostly from dribble and other sources.

HTML Email Tempaltes
Most commonly used HTML email templates. Welcome email, sign up, password reset etc.

Payment Page UI
Checkout our most downloaded payment page ui designed with bootstrap.

Auto Logout Feature
Detect user's inactivity and auto logout after certain timeout using various JS features.

HTML Popups
Keep the user engaged and gain recurring website traffic. Includes templates.

Geolocation
How to get a user's location using Javascript and other techniques available today.
Recent Utilities
- Numerology Calculator
- Invoice Builder
- Chatbot Builder
- QR Tickets
- WPNavbars
- Schema Generator
- Loading shimmer
- Day Planner
- Image Resizer