Modified : 14 Apr 2023

Express Handlebars as templating engine
This tutorial is for beginner - intermediate node js developers who chose handlebars as their templating engine. I chose this as it is easily readable and over the course of time, I've learned some techniques that will help you to leanify (I don't even know if that's a word :-p ) your project structure.
npm install express-handlebars --save1. Handlebars #if - Conditional rendering
There are times where your website pages need different CSS / JS resources but not all. Traditionally, you would include all resources in your head / footer of the layout page. This will cause the webpage to load unnecessary bloat and use-up the browser memory. Nowadays, browsers can handle a lot of memory and are sufficient to load and execute quite a few JS, css and image files. Even so, it's your duty as a quality developer to minimize these overheads as much as possible.
Now you would ask, the JS / CSS are loading from the cache and where is the overhead ? Ok, let's say you are going to a math class and will you carry all the books required for your entire course?I REST MY CASE !
Below is your regular html layout file. Notice how I implemented the {{#if}} statements to import the only required JS / CSS. In the node js code I've passed "pageCSS" & "isProduction" to get the desired result.
<!DOCTYPE html>
<html lang="en">
  <head>
	<meta charset="utf-8">
	<meta name="viewport" content="width=device-width, initial-scale=1">
	<meta http-equiv="Content-Type" content="text/html; charset=utf-8">
	<meta http-equiv = "X-UA-Compatible" content="IE=edge">
        <link rel="icon" href="/static_files/images/favicon.png"/>
        <meta name='robots' content='index, follow, max-image-preview:large, max-snippet:-1, max-video-preview:-1' />
        <link rel="canonical" href="https://yourwebsite.com{{currentPage}}" />
        <link rel="preconnect" href="https://fonts.googleapis.com">
        <link rel="preconnect" href="https://fonts.gstatic.com" crossorigin>
        <link href="https://fonts.googleapis.com/css2?family=Cabin&family=Quicksand:wght@400;700&display=swap" rel="stylesheet">
      	<link rel="stylesheet" href="https://use.fontawesome.com/releases/v5.0.13/css/all.css" integrity="sha384-DNOHZ68U8hZfKXOrtjWvjxusGo9WQnrNx2sqG0tfsghAvtVlRW3tvkXWZh58N9jp" crossorigin="anonymous">
        <link href="https://cdn.jsdelivr.net/npm/bootstrap@5.1.3/dist/css/bootstrap.min.css" rel="stylesheet" integrity="sha384-1BmE4kWBq78iYhFldvKuhfTAU6auU8tT94WrHftjDbrCEXSU1oBoqyl2QvZ6jIW3" crossorigin="anonymous">
        <link rel="stylesheet" type="text/css" href="/static_files/css/common.css">

        {{#if pageCSS}}
      	<link rel="stylesheet" type="text/css" href="/static_files/css/{{pageCSS}}.css">
        {{/if}}
        <title>{{title}}</title>
      	<meta name="description" content= "{{meta}}">

        {{#if isProduction}}
        <!-- Global site tag (gtag.js) - Google Analytics -->
        {{/if}}
app.get('/', (req, res) => {
res.render("home", {
pageJS: 'home',
title: "My Awesome title",
meta: "my awesome meta title",
pageCSS: "home",
isProduction: true
})
})2. Format with Handlebars Helpers
Helpers, the very name says it all.. It's your best friend in need.. truly. There are countless situations where I stored the timestamp in my database in unix string format and I have to display it in the local time string on the browser. With helpers, you can do this in one line of code. Really!
<div>
  {{timeformat 1640811742676}}
  {{timeformat 2021-12-30T21:02:44.022Z}}
</div>
timeformat: function(val){
return val ? (new Date(val)).toLocaleDateString() : ""
}You can create your custom HTML templates. This will make your code much easier to maintain and less code to be written. To render the html code, you must use three curly braces instead of two. Did you know you can label the variables while using helper functions? Lets see it in action
<div>
 {{{myLayout heading="Super blog" para="This is a para about my super blog"}}}
</div>
myLayout: function(val){
var hash = val.hash
return `
<div>
<h2 class="my-3">${hash.heading}</h2>
<p>${hash.para}</p>
</div>
`3. How to access parent object in a loop with handlebars
Time to time, you would want to access the parent object key in each loop. You can do this simply by adding "../" before the object key. In the below example, we are passing two params parentItem and items. When we are in items loop, we accessed the parentItem with "../parentItem"
app.get('/items',(req,res)=>{
  res.render('items-page',{
    parentItem: 'comments',
    items: [{
      "postId": 1,
      "id": 1,
      "name": "id labore ex et quam laborum",
      "email": "Eliseo@gardner.biz",
      "body": "laudantium enim quasi est quidem magnam voluptate ipsam eos\ntempora quo necessitatibus\ndolor quam autem quasi\nreiciendis et nam sapiente accusantium"
    },
    {
      "postId": 1,
      "id": 2,
      "name": "quo vero reiciendis velit similique earum",
      "email": "Jayne_Kuhic@sydney.com",
      "body": "est natus enim nihil est dolore omnis voluptatem numquam\net omnis occaecati quod ullam at\nvoluptatem error expedita pariatur\nnihil sint nostrum voluptatem reiciendis et"
    },
    {
      "postId": 1,
      "id": 3,
      "name": "odio adipisci rerum aut animi",
      "email": "Nikita@garfield.biz",
      "body": "quia molestiae reprehenderit quasi aspernatur\naut expedita occaecati aliquam eveniet laudantium\nomnis quibusdam delectus saepe quia accusamus maiores nam est\ncum et ducimus et vero voluptates excepturi deleniti ratione"
    }]
  })
})
{{#each items}}
<div>
<h3>{{../parentItem }}</h3>
Name : {{this.name}}<br />
Email : {{this.email}}<br />
</div>
{{/each}}4. Use #if as boolean
Typically, the header navbar and footer columns remain the same for the entire site and you are compelled to create a single file, put it in a partials folder and include the file in your layout file. Life's easy! Hold on!.. it's not that simple. What will you do when you want to highlight the page link on the navbar? Think about it and post your answer in the comments.
OK! fine, I will give you a hint. "Don't use Javascript to identify the href and dynamically changing the style of the navbar link". If you give up, expand the code below
View code
Use the if statements to identify the page. For example, in node js route, pass home : true and in the html, use if statement to enable the class. Add style to this class in css. See the code below for more info
app.get('/', (req, res) => {
  res.render("home", {
    home: true
  })
})
.nav-item .active {
color: #fff;
font-weight:bold;
}<li class="nav-item">
<a class="nav-link mx-2 {{#if home}}active{{/if}}" aria-current="page" href="/">Home</a>
</li>5. Dynamic partials in Handlebars
The name says it all. Embed the partial on the fly. Take a look at the below example in which we have an express server serving a route /blog-page. Usually blog pages stay the same for the sidebar, heading and footer / comments section and only the body changes. So, let's say the user is requesting a blog page /blog-page?page=express-handlebars. Create a partial handlebars file in a partial folder and name it express-handlebars.handlebars. Now inside the blogBody.handlebars view page, add the code {{>(whichPartial)}}. That's it! the page will be server dynamically. Moving forward, create more blogs with the same name as the URL search params (page).
app.get('/blog-page',(req,res)=>{
  var page = req.query.page
  if(!page) return res.redirect('404')
  res.render("blogBody", {
    whichPartial : function(){
      return `${page}`
    },
    layout:'blog'
  })
})
<div>
{{>(whichPartial)}}
</div>6. Build HTML Select Tag
You can pass the values to the template such as updating the input values, headings, paras and alsmot every thing except a handful few. Select is one of them. For this we will take the help of helpers.
Lets take a scenario where you want to update the state in a select tag. From the database, we got the value "CT". For this, we need to build the options. See the code below
'stateHighlight' : function(val){
  var states = ["AL","AK","AZ","AR","CA","CO","CT","DE","DC","FL","GA","HI","ID","IL","IN","IA","KS","KY","LA","ME","MD","MA","MI","MN","MS","MO","MT","NE","NV","NH","NJ","NM","NY","NC","ND","OH","OK","OR","PA","RI","SC","SD","TN","TX","UT","VT","VA","WA","WV","WI","WY"]
  var html = ''
  for(var s of states){
    if(val === s) html += `<option value="s" selected="selected">${s}</option>`
    else html += `<option value="${s}">${s}</option>`
  }
  return html
}
<select>{{{stateHighlight dbValue}}}</select>7. Loop through Object & Array with Handlebars
In general Javascript, to loop through an array, you would use the good old for loop or foreach. But to loop throuh the object, you would first get the object keys in an array and then use it to loop through.
In handlebars, you would simply use {{#each}}. See the code below for better understanding
var jsObject = {
  "Fav Heading": {
    para: "Something about my fav heading"
  },
  "Second Heading": {
    para: "Reserved for second heading"
  }
}

var jsArray = [
  {
    "heading": "Fav Heading",
    "para": "Something about my fav heading" },
  {
    "heading": "Second Heading",
    "para": "Reserved for second heading" }
]
<!-- For Looping through Object -->
{{#each jsObject}}
<div>
<h2>{{@key}}</h2>
<p>{{this.para}}</p>
</div>
{{/each}}
<!-- For Looping through Array -->
{{#each jsArray}}
<div>
<h2>{{this.h1}}</h2>
<p>{{this.para}}</p>
</div>
{{/each}}8. Lookup a key in an object
Express handlebars has an inbuilt helper lookup which helps to access the object based on a key. On this day of writing, I've had a peculiar problem. I've gotten the data in two chunks, lets say "obj1" and "obj2". I wanted to access the obj1's key which is present in "obj2". And that too, it needs to be in a condition. See the below code to in action.
// Data from server (database)
var obj1 = {
  "mike" : {
    "class" : "10",
    "group" : "A"
  },
  "john" : {
    "class" : "11",
    "group" : "B"
  },
  "ranga" : {
    "class" : "14",
    "group" : "AB"
  }
}

var obj2 = {
  "students" : ["mike", "john", "ranga"]
}
{{#each obj2}}
<div>{{lookup @root.obj1 @first}}</div>
{{/each}}
See how the lookup is accessing the obj1 with a prefix root and @first of the obj2. To use this whole thing in an if condition, see below
{{#each obj2}}
  <div>{{#if (lookup @root.obj1 @first)}}</div>
{{/each}}
9. Helper Examples
Over my years of experience, I've employed helpers to craft HTML widgets. This approach allows for the creation of robust and reusable widgets, ensuring code consistency and ease of maintenance. Here are a few illustrative examples.
 Make sure you have bootstrap 5 installed for styling and class usage.
-
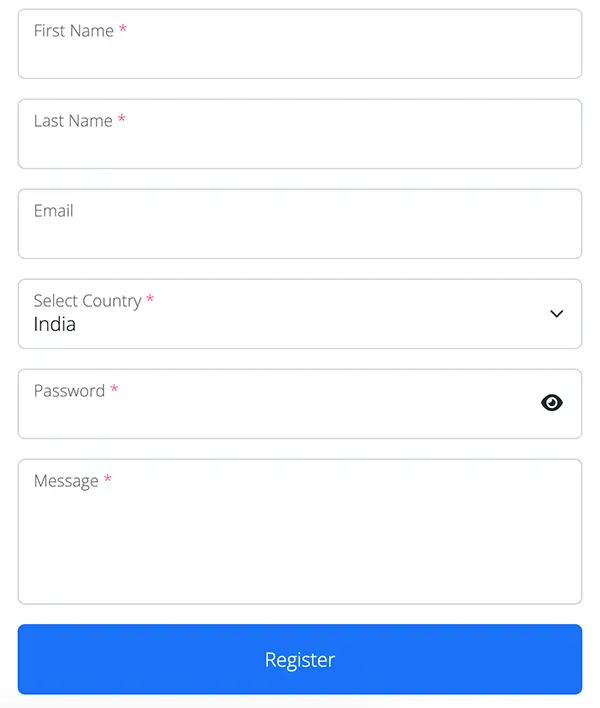
Form Builder
A website or web application typically includes various forms, such as login, forgot password, upload image, upload file, contact us, and more. Crafting HTML code for each of these instances can be a laborious task. Therefore, consider developing a reusable widget as demonstrated below.
// Helper Function
function formFactory(val) {
    var hash = val.hash
    var fields = hash.fields.split(",")

    var html = `<form onsubmit='event.preventDefault();${hash.funcName}(event)'>`
    for (var flds of fields) {
        var f = flds.split(":")
        f[0] = f[0].replace(/ /g, "").replace(/\n/g, "")
        if (f[0].includes('textarea')) {
            html += `
            <div class="form-floating mb-3">
                <textarea type="${f[0]}" id="${f[1]}" name="${f[1]}"  class="form-control" ${f[3] ? 'required' : ""}></textarea>
                <label class="form-label" for="${f[1]}">${f[2]}</label>
            </div>
            `
        } else if (f[0].includes('select')) {
            var opts = f[4].split('|')
            var optsHtml = ""
            for (var o of opts) {
                optsHtml += `<option value="${o}">${o}</option>`
            }

            html += `<div class="form-floating mb-3">
                <select type="${f[0]}" id="${f[1]}" name="${f[1]}"  class="form-select" ${f[3] ? 'required' : ""}>
                    ${optsHtml}
                </select>
                <label class="form-label" for="${f[1]}">${f[2]}</label>
            </div>
            `
        }
        else {
            var autoCompleteAttribute = ""
            if (f[0] === 'password') autoCompleteAttribute = 'autocomplete="new-password"'
            else if (f[0] === 'email') autoCompleteAttribute = 'autocomplete="userid"'

            html += `
            <div class="position-relative">
                <div class="form-floating mb-3">
                    <input type="${f[0]}" id="${f[1]}" name="${f[1]}" ${autoCompleteAttribute}  class="form-control" ${f[3] ? 'required' : ""}>
                    <label class="form-label" for="${f[1]}">${f[2]}</label>
                </div>
                ${f[0] === 'password' ? '<span role="button" class="position-absolute end-0 top-0 m-3 togglePassword" onclick="toggleViewPassword(\'' + f[1] + '\')"><i class="fa-solid fa-eye"></i></span>' : ''}
            </div>
            `
        }

    }
    html += `<button class="btn btn-primary w-100 py-3 text-capitalize">${hash.funcName}</button>`
    html += "</form>"
    return html
}
<!-- Implementation --> {{{formFactory funcName="register" fields=" text:firstName:First Name:required, text:lastName:Last Name:required, email:email:Email, select:countries:Select Country:required:India|Usa|Canada|Sri Lanka, password:password:Password, textarea:message:Message:required "}}}// For toggling password visibility function toggleViewPassword(id) { var elem = document.getElementById(id) if (elem.getAttribute('type') === "password") elem.setAttribute('type', 'text') else elem.setAttribute('type', 'password') }OUTPUT
-
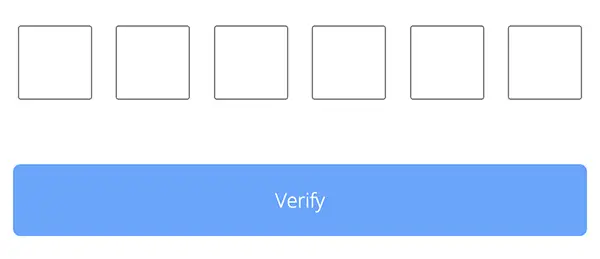
OTP Form
Likewise, there are several scenarios where OTP input fields are required. It is essential for these fields to automatically shift to the next input, and the verification button should remain disabled until the entire OTP is entered.
// Helper Function
function otpFormFactory(val) {
    var hash = val.hash
    return `<form onsubmit="event.preventDefault(); ${hash.funcName}(event)">
                <div class="text-center">
                    <div class="my-5 d-flex justify-content-between">
                        <input type="text" class="otpInput" name="otp_1" required>
                        <input type="text" class="otpInput" name="otp_2" required>
                        <input type="text" class="otpInput" name="otp_3" required>
                        <input type="text" class="otpInput" name="otp_4" required>
                        <input type="text" class="otpInput" name="otp_5" required>
                        <input type="text" class="otpInput" name="otp_6" required>
                    </div>
                    <button class="btn btn-primary py-3 w-100 verifyBtn" disabled>Verify</button>
                </div>
            </form>
            <script defer src="/static_files/js/otpRequest.js"></script>`
}
// otpRequest.js const otpInput = Array.prototype.slice.call( document.querySelectorAll('.otpInput') ); otpInput.forEach((input) => { input.addEventListener('keyup', (event) => { const num = Number(event.key); if (num >= 0 && num <= 9) { // Only allow numbers if (input.value.length >= input.maxLength) { event.preventDefault(); focusNext(); } }else{ console.log("Num enter", num) } }); }); function focusNext() { const currInput = document.activeElement; const currInputIndex = otpInput.indexOf(currInput); if(currInputIndex === 5) { document.getElementsByClassName('verifyBtn')[0].disabled = false return currInput.blur() } const nextinputIndex = (currInputIndex + 1) % otpInput.length; const input = otpInput[nextinputIndex]; input.focus(); }<!-- Implementation --> {{{otpFormFactory funcName="verifyOtp"}}}OUTPUT
-
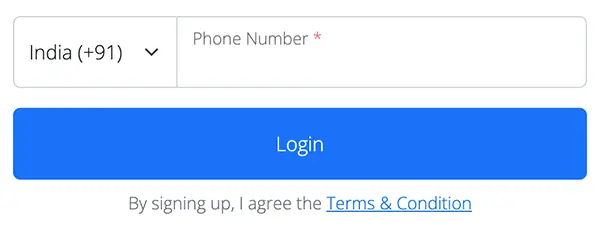
Login With Phone Number
It's a prevalent practice nowadays to enable users to log in to apps using their phone numbers, allowing verification through an OTP. For international usability, this form should also incorporate a selectable country code.
// Helper Function function numberLogin(val) { var hash = val.hash return `<form onsubmit="event.preventDefault();${hash.funcName}(event)"> <div class="input-group mb-3"> <select name="countryCode" id="" class="form-select py-3"> <option data-countryCode="IN" value="91" Selected>India (+91)</option> <option data-countryCode="US" value="1">USA (+1)</option> <option data-countryCode="CA" value="1">Canada (+1)</option> <optgroup label="Other countries"> <option data-countryCode="DZ" value="213">Algeria (+213)</option> <option data-countryCode="AD" value="376">Andorra (+376)</option> <option data-countryCode="AO" value="244">Angola (+244)</option> <option data-countryCode="AI" value="1264">Anguilla (+1264)</option> <option data-countryCode="AG" value="1268">Antigua & Barbuda (+1268)</option> <option data-countryCode="AR" value="54">Argentina (+54)</option> <option data-countryCode="AM" value="374">Armenia (+374)</option> <option data-countryCode="AW" value="297">Aruba (+297)</option> <option data-countryCode="AU" value="61">Australia (+61)</option> <option data-countryCode="AT" value="43">Austria (+43)</option> <option data-countryCode="AZ" value="994">Azerbaijan (+994)</option> <option data-countryCode="BS" value="1242">Bahamas (+1242)</option> <option data-countryCode="BH" value="973">Bahrain (+973)</option> <option data-countryCode="BD" value="880">Bangladesh (+880)</option> <option data-countryCode="BB" value="1246">Barbados (+1246)</option> <option data-countryCode="BY" value="375">Belarus (+375)</option> <option data-countryCode="BE" value="32">Belgium (+32)</option> <option data-countryCode="BZ" value="501">Belize (+501)</option> <option data-countryCode="BJ" value="229">Benin (+229)</option> <option data-countryCode="BM" value="1441">Bermuda (+1441)</option> <option data-countryCode="BT" value="975">Bhutan (+975)</option> <option data-countryCode="BO" value="591">Bolivia (+591)</option> <option data-countryCode="BA" value="387">Bosnia Herzegovina (+387)</option> <option data-countryCode="BW" value="267">Botswana (+267)</option> <option data-countryCode="BR" value="55">Brazil (+55)</option> <option data-countryCode="BN" value="673">Brunei (+673)</option> <option data-countryCode="BG" value="359">Bulgaria (+359)</option> <option data-countryCode="BF" value="226">Burkina Faso (+226)</option> <option data-countryCode="BI" value="257">Burundi (+257)</option> <option data-countryCode="KH" value="855">Cambodia (+855)</option> <option data-countryCode="CM" value="237">Cameroon (+237)</option> <!-- <option data-countryCode="CA" value="1">Canada (+1)</option> --> <option data-countryCode="CV" value="238">Cape Verde Islands (+238)</option> <option data-countryCode="KY" value="1345">Cayman Islands (+1345)</option> <option data-countryCode="CF" value="236">Central African Republic (+236)</option> <option data-countryCode="CL" value="56">Chile (+56)</option> <option data-countryCode="CN" value="86">China (+86)</option> <option data-countryCode="CO" value="57">Colombia (+57)</option> <option data-countryCode="KM" value="269">Comoros (+269)</option> <option data-countryCode="CG" value="242">Congo (+242)</option> <option data-countryCode="CK" value="682">Cook Islands (+682)</option> <option data-countryCode="CR" value="506">Costa Rica (+506)</option> <option data-countryCode="HR" value="385">Croatia (+385)</option> <option data-countryCode="CU" value="53">Cuba (+53)</option> <option data-countryCode="CY" value="90392">Cyprus North (+90392)</option> <option data-countryCode="CY" value="357">Cyprus South (+357)</option> <option data-countryCode="CZ" value="42">Czech Republic (+42)</option> <option data-countryCode="DK" value="45">Denmark (+45)</option> <option data-countryCode="DJ" value="253">Djibouti (+253)</option> <option data-countryCode="DM" value="1809">Dominica (+1809)</option> <option data-countryCode="DO" value="1809">Dominican Republic (+1809)</option> <option data-countryCode="EC" value="593">Ecuador (+593)</option> <option data-countryCode="EG" value="20">Egypt (+20)</option> <option data-countryCode="SV" value="503">El Salvador (+503)</option> <option data-countryCode="GQ" value="240">Equatorial Guinea (+240)</option> <option data-countryCode="ER" value="291">Eritrea (+291)</option> <option data-countryCode="EE" value="372">Estonia (+372)</option> <option data-countryCode="ET" value="251">Ethiopia (+251)</option> <option data-countryCode="FK" value="500">Falkland Islands (+500)</option> <option data-countryCode="FO" value="298">Faroe Islands (+298)</option> <option data-countryCode="FJ" value="679">Fiji (+679)</option> <option data-countryCode="FI" value="358">Finland (+358)</option> <option data-countryCode="FR" value="33">France (+33)</option> <option data-countryCode="GF" value="594">French Guiana (+594)</option> <option data-countryCode="PF" value="689">French Polynesia (+689)</option> <option data-countryCode="GA" value="241">Gabon (+241)</option> <option data-countryCode="GM" value="220">Gambia (+220)</option> <option data-countryCode="GE" value="7880">Georgia (+7880)</option> <option data-countryCode="DE" value="49">Germany (+49)</option> <option data-countryCode="GH" value="233">Ghana (+233)</option> <option data-countryCode="GI" value="350">Gibraltar (+350)</option> <option data-countryCode="GR" value="30">Greece (+30)</option> <option data-countryCode="GL" value="299">Greenland (+299)</option> <option data-countryCode="GD" value="1473">Grenada (+1473)</option> <option data-countryCode="GP" value="590">Guadeloupe (+590)</option> <option data-countryCode="GU" value="671">Guam (+671)</option> <option data-countryCode="GT" value="502">Guatemala (+502)</option> <option data-countryCode="GN" value="224">Guinea (+224)</option> <option data-countryCode="GW" value="245">Guinea - Bissau (+245)</option> <option data-countryCode="GY" value="592">Guyana (+592)</option> <option data-countryCode="HT" value="509">Haiti (+509)</option> <option data-countryCode="HN" value="504">Honduras (+504)</option> <option data-countryCode="HK" value="852">Hong Kong (+852)</option> <option data-countryCode="HU" value="36">Hungary (+36)</option> <option data-countryCode="IS" value="354">Iceland (+354)</option> <!-- <option data-countryCode="IN" value="91">India (+91)</option> --> <option data-countryCode="ID" value="62">Indonesia (+62)</option> <option data-countryCode="IR" value="98">Iran (+98)</option> <option data-countryCode="IQ" value="964">Iraq (+964)</option> <option data-countryCode="IE" value="353">Ireland (+353)</option> <option data-countryCode="IL" value="972">Israel (+972)</option> <option data-countryCode="IT" value="39">Italy (+39)</option> <option data-countryCode="JM" value="1876">Jamaica (+1876)</option> <option data-countryCode="JP" value="81">Japan (+81)</option> <option data-countryCode="JO" value="962">Jordan (+962)</option> <option data-countryCode="KZ" value="7">Kazakhstan (+7)</option> <option data-countryCode="KE" value="254">Kenya (+254)</option> <option data-countryCode="KI" value="686">Kiribati (+686)</option> <option data-countryCode="KP" value="850">Korea North (+850)</option> <option data-countryCode="KR" value="82">Korea South (+82)</option> <option data-countryCode="KW" value="965">Kuwait (+965)</option> <option data-countryCode="KG" value="996">Kyrgyzstan (+996)</option> <option data-countryCode="LA" value="856">Laos (+856)</option> <option data-countryCode="LV" value="371">Latvia (+371)</option> <option data-countryCode="LB" value="961">Lebanon (+961)</option> <option data-countryCode="LS" value="266">Lesotho (+266)</option> <option data-countryCode="LR" value="231">Liberia (+231)</option> <option data-countryCode="LY" value="218">Libya (+218)</option> <option data-countryCode="LI" value="417">Liechtenstein (+417)</option> <option data-countryCode="LT" value="370">Lithuania (+370)</option> <option data-countryCode="LU" value="352">Luxembourg (+352)</option> <option data-countryCode="MO" value="853">Macao (+853)</option> <option data-countryCode="MK" value="389">Macedonia (+389)</option> <option data-countryCode="MG" value="261">Madagascar (+261)</option> <option data-countryCode="MW" value="265">Malawi (+265)</option> <option data-countryCode="MY" value="60">Malaysia (+60)</option> <option data-countryCode="MV" value="960">Maldives (+960)</option> <option data-countryCode="ML" value="223">Mali (+223)</option> <option data-countryCode="MT" value="356">Malta (+356)</option> <option data-countryCode="MH" value="692">Marshall Islands (+692)</option> <option data-countryCode="MQ" value="596">Martinique (+596)</option> <option data-countryCode="MR" value="222">Mauritania (+222)</option> <option data-countryCode="YT" value="269">Mayotte (+269)</option> <option data-countryCode="MX" value="52">Mexico (+52)</option> <option data-countryCode="FM" value="691">Micronesia (+691)</option> <option data-countryCode="MD" value="373">Moldova (+373)</option> <option data-countryCode="MC" value="377">Monaco (+377)</option> <option data-countryCode="MN" value="976">Mongolia (+976)</option> <option data-countryCode="MS" value="1664">Montserrat (+1664)</option> <option data-countryCode="MA" value="212">Morocco (+212)</option> <option data-countryCode="MZ" value="258">Mozambique (+258)</option> <option data-countryCode="MN" value="95">Myanmar (+95)</option> <option data-countryCode="NA" value="264">Namibia (+264)</option> <option data-countryCode="NR" value="674">Nauru (+674)</option> <option data-countryCode="NP" value="977">Nepal (+977)</option> <option data-countryCode="NL" value="31">Netherlands (+31)</option> <option data-countryCode="NC" value="687">New Caledonia (+687)</option> <option data-countryCode="NZ" value="64">New Zealand (+64)</option> <option data-countryCode="NI" value="505">Nicaragua (+505)</option> <option data-countryCode="NE" value="227">Niger (+227)</option> <option data-countryCode="NG" value="234">Nigeria (+234)</option> <option data-countryCode="NU" value="683">Niue (+683)</option> <option data-countryCode="NF" value="672">Norfolk Islands (+672)</option> <option data-countryCode="NP" value="670">Northern Marianas (+670)</option> <option data-countryCode="NO" value="47">Norway (+47)</option> <option data-countryCode="OM" value="968">Oman (+968)</option> <option data-countryCode="PW" value="680">Palau (+680)</option> <option data-countryCode="PA" value="507">Panama (+507)</option> <option data-countryCode="PG" value="675">Papua New Guinea (+675)</option> <option data-countryCode="PY" value="595">Paraguay (+595)</option> <option data-countryCode="PE" value="51">Peru (+51)</option> <option data-countryCode="PH" value="63">Philippines (+63)</option> <option data-countryCode="PL" value="48">Poland (+48)</option> <option data-countryCode="PT" value="351">Portugal (+351)</option> <option data-countryCode="PR" value="1787">Puerto Rico (+1787)</option> <option data-countryCode="QA" value="974">Qatar (+974)</option> <option data-countryCode="RE" value="262">Reunion (+262)</option> <option data-countryCode="RO" value="40">Romania (+40)</option> <option data-countryCode="RU" value="7">Russia (+7)</option> <option data-countryCode="RW" value="250">Rwanda (+250)</option> <option data-countryCode="SM" value="378">San Marino (+378)</option> <option data-countryCode="ST" value="239">Sao Tome & Principe (+239)</option> <option data-countryCode="SA" value="966">Saudi Arabia (+966)</option> <option data-countryCode="SN" value="221">Senegal (+221)</option> <option data-countryCode="CS" value="381">Serbia (+381)</option> <option data-countryCode="SC" value="248">Seychelles (+248)</option> <option data-countryCode="SL" value="232">Sierra Leone (+232)</option> <option data-countryCode="SG" value="65">Singapore (+65)</option> <option data-countryCode="SK" value="421">Slovak Republic (+421)</option> <option data-countryCode="SI" value="386">Slovenia (+386)</option> <option data-countryCode="SB" value="677">Solomon Islands (+677)</option> <option data-countryCode="SO" value="252">Somalia (+252)</option> <option data-countryCode="ZA" value="27">South Africa (+27)</option> <option data-countryCode="ES" value="34">Spain (+34)</option> <option data-countryCode="LK" value="94">Sri Lanka (+94)</option> <option data-countryCode="SH" value="290">St. Helena (+290)</option> <option data-countryCode="KN" value="1869">St. Kitts (+1869)</option> <option data-countryCode="SC" value="1758">St. Lucia (+1758)</option> <option data-countryCode="SD" value="249">Sudan (+249)</option> <option data-countryCode="SR" value="597">Suriname (+597)</option> <option data-countryCode="SZ" value="268">Swaziland (+268)</option> <option data-countryCode="SE" value="46">Sweden (+46)</option> <option data-countryCode="CH" value="41">Switzerland (+41)</option> <option data-countryCode="SI" value="963">Syria (+963)</option> <option data-countryCode="TW" value="886">Taiwan (+886)</option> <option data-countryCode="TJ" value="7">Tajikstan (+7)</option> <option data-countryCode="TH" value="66">Thailand (+66)</option> <option data-countryCode="TG" value="228">Togo (+228)</option> <option data-countryCode="TO" value="676">Tonga (+676)</option> <option data-countryCode="TT" value="1868">Trinidad & Tobago (+1868)</option> <option data-countryCode="TN" value="216">Tunisia (+216)</option> <option data-countryCode="TR" value="90">Turkey (+90)</option> <option data-countryCode="TM" value="7">Turkmenistan (+7)</option> <option data-countryCode="TM" value="993">Turkmenistan (+993)</option> <option data-countryCode="TC" value="1649">Turks & Caicos Islands (+1649)</option> <option data-countryCode="TV" value="688">Tuvalu (+688)</option> <option data-countryCode="UG" value="256">Uganda (+256)</option> <option data-countryCode="GB" value="44">UK (+44)</option> <option data-countryCode="UA" value="380">Ukraine (+380)</option> <option data-countryCode="AE" value="971">United Arab Emirates (+971)</option> <option data-countryCode="UY" value="598">Uruguay (+598)</option> <option data-countryCode="UZ" value="7">Uzbekistan (+7)</option> <option data-countryCode="VU" value="678">Vanuatu (+678)</option> <option data-countryCode="VA" value="379">Vatican City (+379)</option> <option data-countryCode="VE" value="58">Venezuela (+58)</option> <option data-countryCode="VN" value="84">Vietnam (+84)</option> <option data-countryCode="VG" value="84">Virgin Islands - British (+1284)</option> <option data-countryCode="VI" value="84">Virgin Islands - US (+1340)</option> <option data-countryCode="WF" value="681">Wallis & Futuna (+681)</option> <option data-countryCode="YE" value="969">Yemen (North)(+969)</option> <option data-countryCode="YE" value="967">Yemen (South)(+967)</option> <option data-countryCode="ZM" value="260">Zambia (+260)</option> <option data-countryCode="ZW" value="263">Zimbabwe (+263)</option> </optgroup> </select> <div class="form-floating" style="flex : 4 !important"> <input type="text" name="phone" class="form-control" required> <label for="phone">Phone Number</label> </div> </div> <button class="btn btn-primary w-100 text-capitalize py-3">${hash.funcName}</button> <p class="text-center mt-2 text-muted small">By signing up, I agree the <a href="/terms-conditions" target="_blank">Terms & Condition</a></p> </form>` }<!-- Implementation --> {{{numberLogin funcName="login"}}}OUTPUT
Post a comment
Comments
Recent Posts

Webcam to CCTV
Do you want to access your webcamera remotely? Then this article is for you.
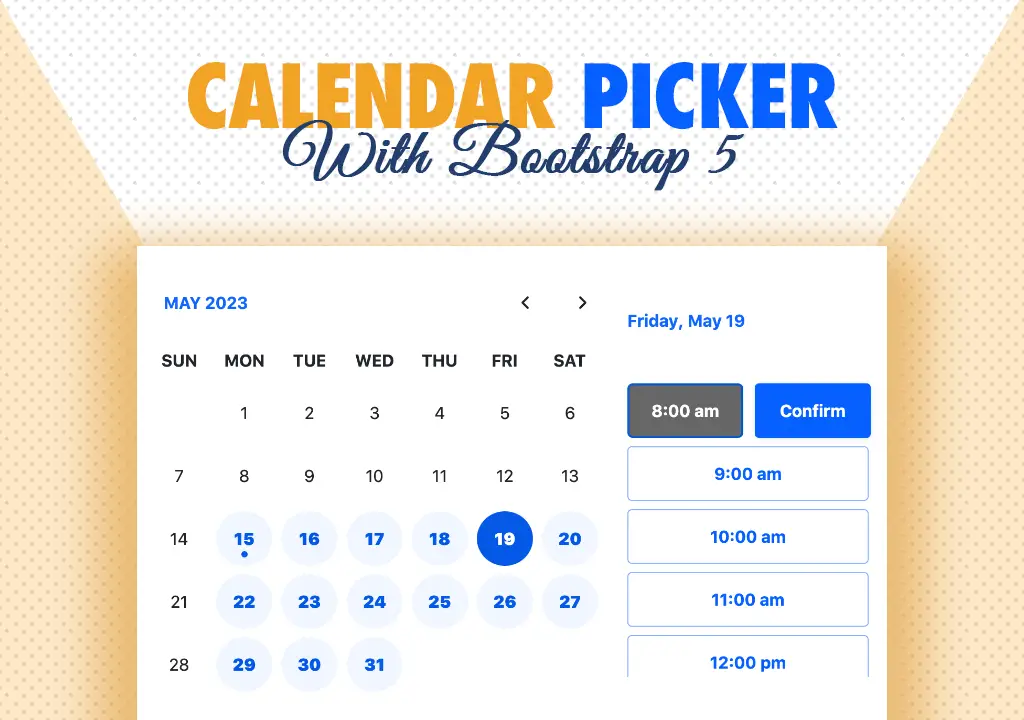
Calendar Picker
Calendar Picker / Appointment Setter JS CSS Library. Inspired by Calendly.

File Sharing Server
Create a local file sharing server with realtime sync feature using Socket IO.

Tailwind Navbars
Most beautiful Navbars designed with tailwind css. Fully responsive templates.
Dashboard UIs
Most beautiful dashboards designed with bootstrap 5. Inspired mostly from dribble and other sources.

HTML Email Tempaltes
Most commonly used HTML email templates. Welcome email, sign up, password reset etc.

Payment Page UI
Checkout our most downloaded payment page ui designed with bootstrap.

Auto Logout Feature
Detect user's inactivity and auto logout after certain timeout using various JS features.

HTML Popups
Keep the user engaged and gain recurring website traffic. Includes templates.
Geolocation
How to get a user's location using Javascript and other techniques available today.
Recent Utilities
- Numerology Calculator
- Invoice Builder
- Chatbot Builder
- QR Tickets
- WPNavbars
- Schema Generator
- Loading shimmer
- Day Planner
- Image Resizer